如何部署SSL证书,实现https访问呢?
HTTP请求总是被浏览器拦截劝退,提示不安全。SSL/TLS 证书不仅是安全防护的基础,也是现代网站的必备标准。无论是保护用户隐私、提升品牌可信度,还是满足技术需求,配置 HTTPS 都至关重要。
一:使用License证书
License证书可以免费获取也可以付费购买,小型网站建议使用免费证书即可,中大型网站可在阿里云等厂商购买。免费证书建议使用Let's Encrypt,这是一个免费、自动化、开放的 SSL/TLS 证书颁发机构,特点是免费且使用方便。下面介绍如何使用Let's Encrypt
1、安装客户端
我们以CentOS和Nginx的服务器配置为例。Let's Encrypt有个官方客户端叫Certbot,推荐使用该客户端来配置。
首先要安装这个客户端,然后申请证书,设置自动续期。暗转过程方便省心
# CentOS/RHEL暗转客户端
sudo yum install certbot python3-certbot-nginx

# 申请证书 www.example.com 需要按需修改
sudo certbot --nginx -d example.com -d www.example.com

# 自动续期测试
sudo certbot renew --dry-run

# 如果成功,可以设置 cron 定时任务 自动续期:
0 0 * * * /usr/bin/certbot renew --quiet
此步骤需要注意,域名解析中一定要配置A记录类型,主机记录选@。A类型可以配置多条,但其中一条必须是@记录,如下图。否则申请证书无法通过。

二、 Nginx配置
执行上面代码第二句申请证书后,Certbot会自动修改你Nginx的配置文件。
通常在 /etc/nginx/nginx.conf,找到包含 example.com 和 www.example.com 的 server 块,并自动添加 HTTPS 相关配置,包括:
- 监听 443 端口(HTTPS)
- 配置 SSL 证书路径(
/etc/letsencrypt/live/example.com/)
- 设置强加密协议(TLS 1.2/1.3)
- 添加 HTTP → HTTPS 301 重定向(可选,默认会询问你是否启用)
Certbot可以自动修改配置,但不一定能用,具体还要测试辨别。
因为我当时走了很长的弯路才配置好这个文件,所以我把我最终配好的Nginx.conf分享给大家
user nginx;
worker_processes auto;
error_log /var/log/nginx/error.log;
pid /run/nginx.pid;

events {
    worker_connections 1024;
}

http {
    # 基础配置保持不变...
    include /etc/nginx/mime.types;
    default_type application/octet-stream;

    # HTTP 服务器 - 只做重定向
    server {
        listen 80;
        server_name codinglife.online www.codinglife.online;
        return 301 https://$host$request_uri;
    }

    # HTTPS 服务器 - 主配置
    server {
        listen 443 ssl;
        server_name codinglife.online www.codinglife.online;

        # SSL 配置
        ssl_certificate /etc/letsencrypt/live/codinglife.online/fullchain.pem;
        ssl_certificate_key /etc/letsencrypt/live/codinglife.online/privkey.pem;
        include /etc/letsencrypt/options-ssl-nginx.conf;
        ssl_dhparam /etc/letsencrypt/ssl-dhparams.pem;

        # 前端配置
        location / {
            root /var/www/user;
            index index.html;
            try_files $uri $uri/ /index.html;
        }

        location /admin {
            alias /var/www/admin;
            index index.html;
            try_files $uri $uri/ /admin/index.html;
        }

        # 后端API配置 - 关键修改点
        location /api {proxy_pass http://localhost:8080/;  # 后端服务地址
    		proxy_set_header Host $host;
    		proxy_set_header X-Real-IP $remote_addr;
    		proxy_set_header X-Forwarded-For $proxy_add_x_forwarded_for;
    		proxy_set_header X-Forwarded-Proto $scheme;

		# 关键:显式传递 Authorization 头
    		proxy_set_header Authorization $http_Authorization;

 		# 跨域配置
    		add_header 'Access-Control-Allow-Origin' 'https://codinglife.online';
    		add_header 'Access-Control-Allow-Methods' 'GET, POST, PUT, DELETE, OPTIONS';
    		add_header 'Access-Control-Allow-Headers' 'Authorization, Content-Type';
    		add_header 'Access-Control-Allow-Credentials' 'true';

    		if ($request_method = 'OPTIONS') {
        		return 204;
    		}
        }

        location /uploads/ {
            alias /opt/CodingLife/uploads/;
        }
    }
}
1、重用443服务
因为通常情况下http服务是用的80端口,但是https服务用的443端口。之前主要配置可能都写在80服务里,现在要调整到443服务里,80端口只用来做重定向就行。
比如本来访问的 http://www.codinglife.online,打开该网页会自动跳转到https://www.codinglife.online。
因为要用443端口了,必须确保你的服务器这个端口是开放的。
2、SSL配置无需改动
如上代码中,SSL配置在Certbot自动配置后,无需改动。如下
# SSL 配置
ssl_certificate /etc/letsencrypt/live/codinglife.online/fullchain.pem;
ssl_certificate_key /etc/letsencrypt/live/codinglife.online/privkey.pem;
include /etc/letsencrypt/options-ssl-nginx.conf;
ssl_dhparam /etc/letsencrypt/ssl-dhparams.pem;
3、接口代理
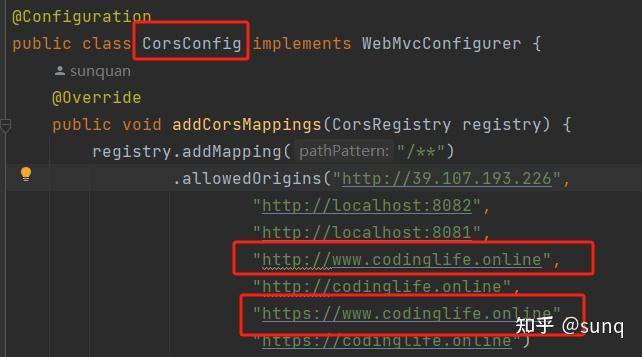
注意如果SpringBoot代码中有限制访问域名时,因为从http改为了https请求,JAVA也别忘了调整

三:配置效果
配置后的效果可以参考我的网站:https://www.codinglife.online


